If you want to deliver your presentation via a Web server on the Internet or an intranet, or if you want to publish and upload your presentation to an FTP site, then follow the Publish for Web instructions below.
When you Publish for Web, you have two choices as to where you want to store your published presentation, a local folder/network share, or an FTP site.
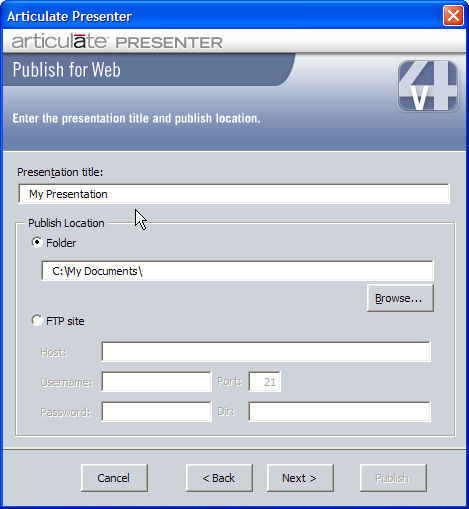
To begin, under Presentation title, type the name for your published presentation. Next, follow the instructions below depending on your desired storage location.
To publish to a local folder/network share, select Folder (the default) and:
§ manually type the path to the folder/network share, or
§ click the Browse button, navigate to the folder/network share, select it, and click OK
 Tip: Although
you can publish to a shared network drive, all your content resources
(PowerPoint file, custom logo, presenter photo, narration, etc.) must
reside on your local drive in order for your presentation to publish properly.
Visit the Locals
Only entry in Word of
Mouth - The Articulate Blog for more on this topic.
Tip: Although
you can publish to a shared network drive, all your content resources
(PowerPoint file, custom logo, presenter photo, narration, etc.) must
reside on your local drive in order for your presentation to publish properly.
Visit the Locals
Only entry in Word of
Mouth - The Articulate Blog for more on this topic.
To publish to an FTP site, select FTP site and provide the following information:
|
Host |
The DNS/IP address of the FTP site. |
|
Username |
If the FTP site does not allow anonymous access, enter your Username. |
|
Port |
FTP servers generally use port 21. If more than one FTP site is being hosted on the same server, the port number may be different. For more information, check with your network administrator. |
|
Password |
If the FTP site does not allow anonymous access, enter your Password here. |
|
Dir |
If you want to publish to a specific folder/directory within the FTP site, enter the folder/directory name here. |
When you are finished entering the applicable information above, click Next to continue. You will then be asked to select your player template format.
Tip: Publishing
to an FTP site will first compress your files into a .zip file and then
upload the .zip file to the specified directory on your server. To launch
the presentation from the server, you will first need to unzip the files
on the server. Contact your server administrator for assistance with unzipping
the files.
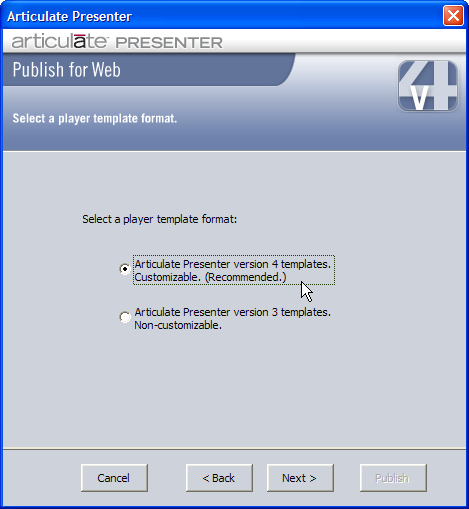
You have two choices for player template format:
Articulate Presenter Version 4 templates: This is the recommended format. Using Version 4 templates provides greater customization options for the Articulate Player.
Articulate Presenter version 3 templates: This option is provided for backward compatibility with Articulate Presenter version 3 only. Unless you have a specific reason for doing so, it is recommended you publish using version 4 templates.
After you have made your selection, click Next to continue. If you have chosen to publish using Articulate Presenter version 4 templates, please see Publishing For Web Using Templates. If you have chosen to publish using Articulate Presenter version 3, continue with the instructions below. If you are publishing to a SCORM or AICC LMS, please see Displaying and Selecting SCORM or AICC Players.
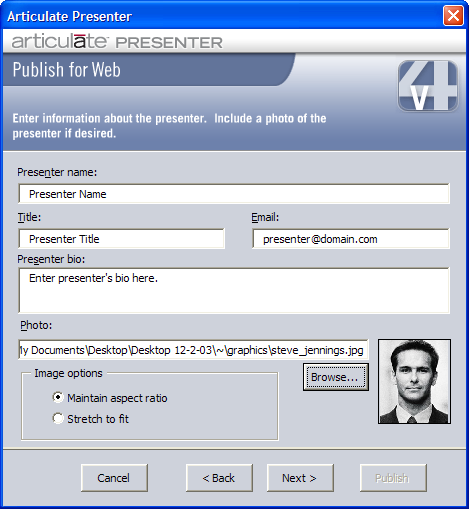
The presenter information will automatically be taken from the default presenter information entered on the Presenter tab in Articulate | Options. If you want the presenter information for your published presentation to be different from the default, you can change it here. For an explanation of these fields, see Configuring the Options. When you are finished, click Next to continue.
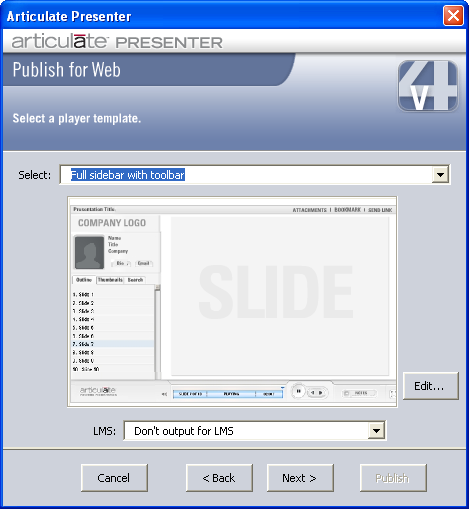
You have two or three choices, depending on how you set your LMS options:
Select: Click the down arrow to select from available player templates. You will see the seven pre-configured Master Templates, along with any custom templates you may have created. Note: The last player template (master or customized) that you used will always be selected when you reach this step of the Publish Wizard.
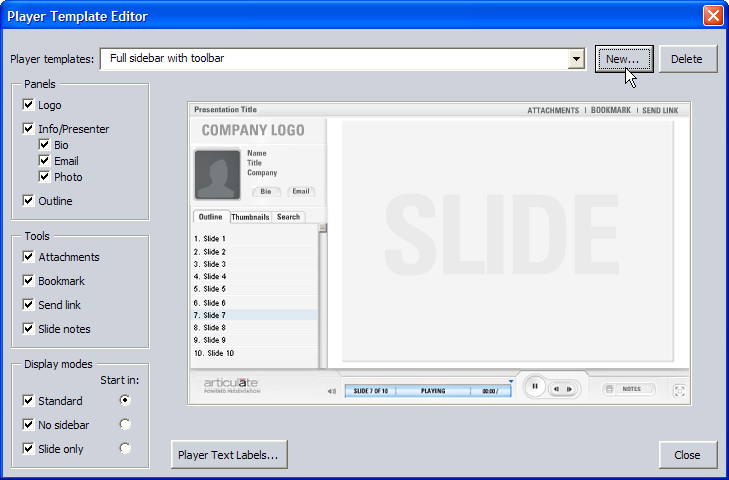
Edit: If you click Edit, you will see the Player Template Editor. Please see below for additional information.
LMS: You will only see this option if you've selected to display SCORM and/or AICC players. If you see this field, you will have up to three choices:
Don't output for LMS. Your presentation will not include LMS tags or output files for your LMS.
Output for SCORM LMS. Your presentation will be published with appropriate SCORM-compliant files.
Output for AICC LMS.Your presentation will be published with appropriate AICC-compliant files.
Note:
For more
on publishing a SCORM- or AICC-compliant presentation, please see Displaying
SCORM or AICC Players.
When you have made your choices, click Next.
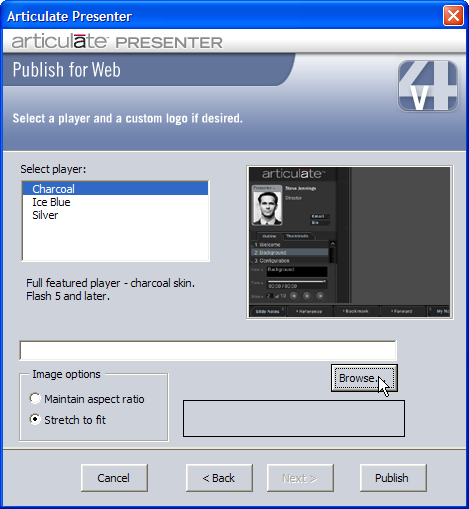
If you have chosen to publish using version 3.x player templates, you can customize the Articulate Player when you Publish for Web. Customization options include your choice of color for the player, and your custom logo. Your options are the following:
Player color
You have your choice of three different player colors (skins): Charcoal, Ice Blue, and Silver. The charcoal player is the default. To preview how each player will look when published, click on the color name in the list under Select Player; the sample player to the right will change to reflect the chosen color. All players require that the viewer have Flash 5 Player or later installed.
Note:
If you
are publishing a SCORM- or AICC-compliant presentation, please see Displaying
SCORM or AICC Players.
Custom logo
You can use your own logo in the Articulate Player. Supported logo formats are swf (Flash), jpg, gif, bmp, emf, and wmf. The dimensions of your logo should be 222 pixels wide x 37 pixels high. If your logo is not exactly 222x37, you have two options:
To maintain the dimensions of your logo, select “Maintain aspect ratio,” under Image Options.
If you would like your logo to stretch to fit the entire width of the logo area in the player, select "Stretch to fit," under Image Options.
When you are finished customizing your Articulate player, click Publish.
If you have chosen to publish to a local folder/network share, you will receive the following message:
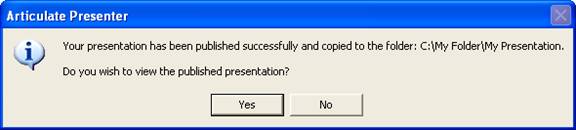
If you click Yes, your published presentation will automatically launch in the Articulate Player. If you click No, you can always launch your presentation later. For more information on launching a published presentation, see Viewing Your Published Presentation.
If you have chosen to publish to an FTP site, you will be shown the upload status/number of bytes uploaded. When uploading is complete, you will see the following message:
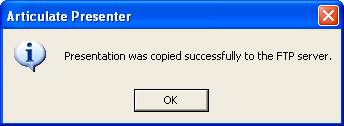
Your presentation will be uploaded to the FTP site as a Zip file. If you do not get the above message, verify that you have entered the correct authentication information and FTP server address.